How to Create a Photo Backdrop Using Dried Lavender Bundles
It’s wedding season! Fun fact: the majority of our lavender flies off the shelves to eager couples preparing to tie the knot. Most couples use lavender mixed in with fresh seasonal blooms for their big day. Some couples are inclined to get more creative with their dried lavender bundles. To honour those creative couples, we are talking about feature backdrops, photo walls and arches in this post. More importantly, we’re going to show you how to calculate how much lavender you actually need to pull off one of these show stopping designs for your next big event.
First of all, dried lavender bundles are an ideal choice for this type of large scale project. Dried lavender will last for years and doesn’t spoil. Therefore, it makes for a very versatile option when planning to undertake a project of this scope. Fresh blooms often need to be installed the day of your event. This can make it challenging for couples who like to know exactly what their backdrop will look like ahead of the frenzied flashbulbs. Alternatively, if you like to be a step ahead, then dried lavender backdrops can be made weeks in advance. This is great for couples who want to check as many things off their list as possible before their big day arrives.
HOW MUCH DRIED LAVENDER DOES A PHOTO BACKDROP FOR WEDDINGS NEED?
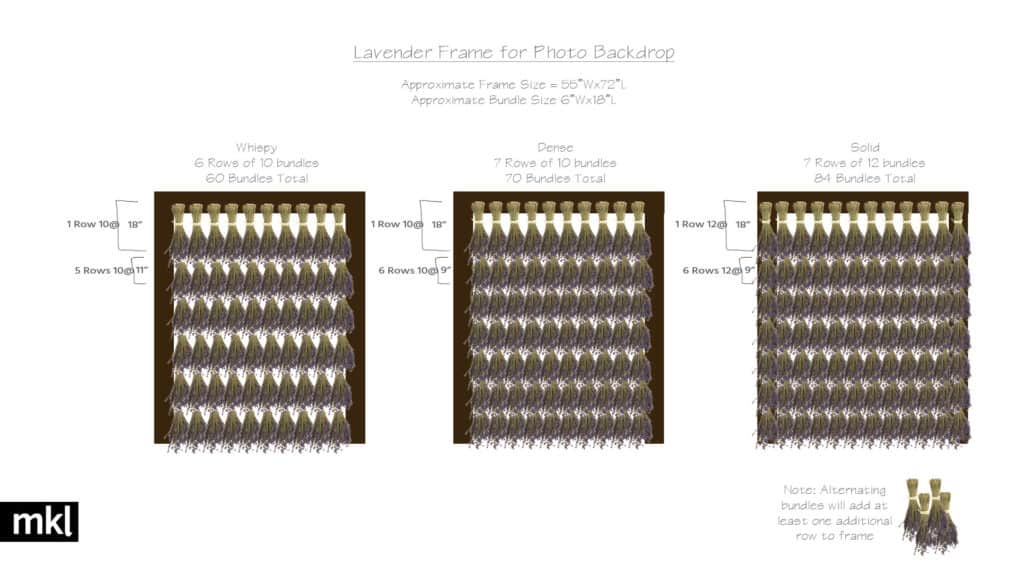
This is a common question we receive at MKL. Thankfully, we have done the work so you don’t have to waste too much planning time calculating out your order. The general rule of thumb is that a dried bundle of lavender is approximately 6 inches wide at the floral top. Bundles are approximately 18 inches long from top to bottom. With those two measurements in hand we are ready to tackle the next step which is determining how dense you want your photo backdrop to be.
Take a look at the diagram below:
To illustrate this we have used a fairly easy to construct lumber frame. This frame is illustrated at 55″ (4.5ft) wide and 72″ (6ft) at the height. We find that this frame is a nice size to keep costs in check. In addition, it also fits two snugly people, perfectly in the lens of any camera.
You will want to start your first row of lavender at the top of your frame to get your starting point. Keep in mind that the top row of lavender bundles will be visible from stem to floral tops. Due to this, you may want to tie some ribbon around the stems to cover the twist ties. Using ribbon is also a great way to tie the wall into your event’s colour palette.
For a whimsical lavender wedding photo backdrop look we suggest individually wrapping the stems of each front line bundle. If you want a more modern look, you can opt to stretch one straight band of 2-4″ ribbon straight across the top line of the bundles.
HOW DENSE DO YOU WANT YOUR LAVENDER WALL TO BE?
Next you will want to arrange each subsequent row. To do this you will want to first decide how dense you want the wall to look. In this example we are going to use the ‘Whispy’ example from above. This design gives you floral coverage that will still allow for some light to filter through and the outline of the frame to show.
Your cross members will ideally be fastened into place based using the measurements above. Next you can gently tack the dried lavender bundles under the floral top of the bundle above. Use garden ties to secure the bundles to the cross members underneath. Your cross members can be made from any material. We have found that airplane wire, 1×2 wood slats or even PVC will do the trick. For more coverage try alternating each bundle when you tack it in place. Repeat on each cross member down the full length until you have coverage from top to bottom.
The only things left after you have the bundles in place, is to make a toast and snap a few test pics in front of your gorgeous new wedding photo backdrop made from lavender! Don’t forget to tag us #MKLWedding – we love seeing what lavender projects you’re up to!